# Kubernetes
# What does Managed mean?
We offer a managed Kubernetes service.
What does Managed mean at NMS:
1\. **We install the cluster**
- [here](https://docs.nws.netways.de/books/kubernetes/chapter/getting-started) you can find more info about starting your cluster
2\. **We operate and monitor your cluster**
- If a master or worker changes to "not ready", we will be alerted and fix the problem
- We monitor the K8s system namespace in Prometheus and make sure that e.g. the load balancers are working or the PVCs are mapped correctly
- More information about monitoring can be found [here](https://docs.nws.netways.de/books/kubernetes/page/monitoring)
3\. **We offer updates**
- The updates are divided into operating system updates and K8s version updates
- For the K8s version updates we test the new version in advance and make sure that the normal standard installation still works with the new version
- You can find more information about the updates [here](https://docs.nws.netways.de/books/kubernetes/page/upgrades)
4. **We offer Backups**
- Etcd Backup
- PVC Backup
- [here](https://docs.nws.netways.de/books/kubernetes/page/backup) you will find more information about backups
# Getting Started
# Create NWS Managed Kubernetes
To start our Managed Kubernetes service, you must first create an account on our [NWS Customer Interface](https://my.nws.netways.de/) and provide a valid [payment method](https://docs.nws.netways.de/books/nws-dashboard/page/set-up-and-change-the-payment-method).
After that you can create your Kubernetes project. It should take less than a minute until the project is ready. **The project itself is free as long as you don't launch a cluster as explained below.**
[](https://docs.nws.netways.de/uploads/images/gallery/2022-12/opBEBRneb4rA12yz-k8s-1.PNG)
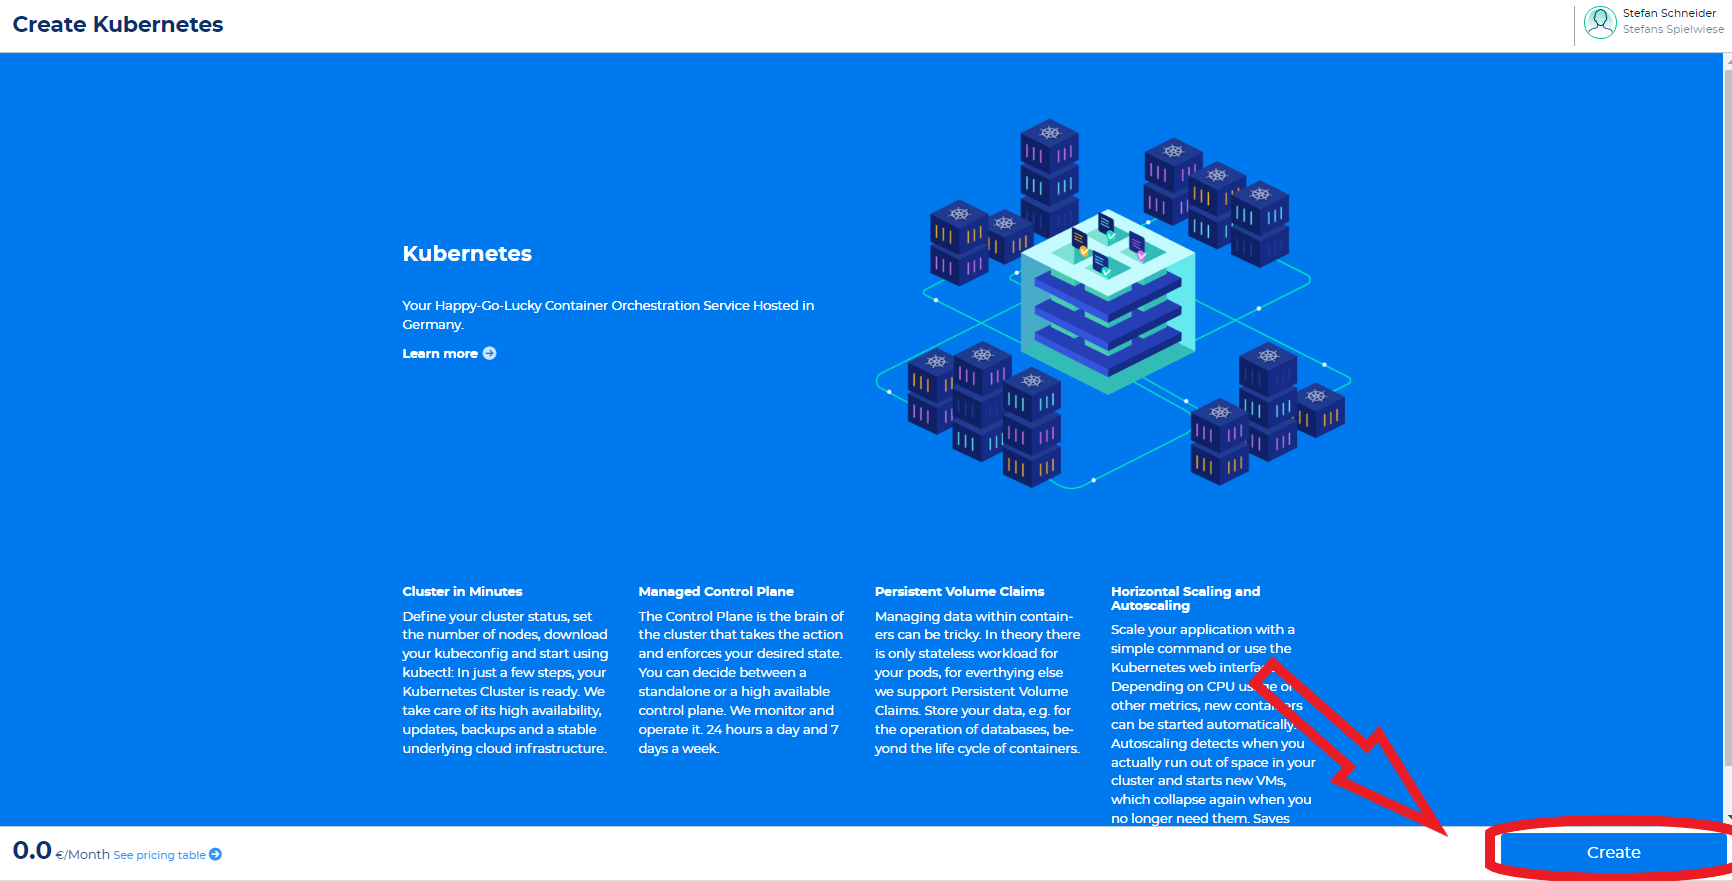
Once the project is ready, you can launch your first Kubernetes Cluster.
[](https://docs.nws.netways.de/uploads/images/gallery/2022-12/QP3ShxOt1P6RSU3G-k8s-3.PNG)
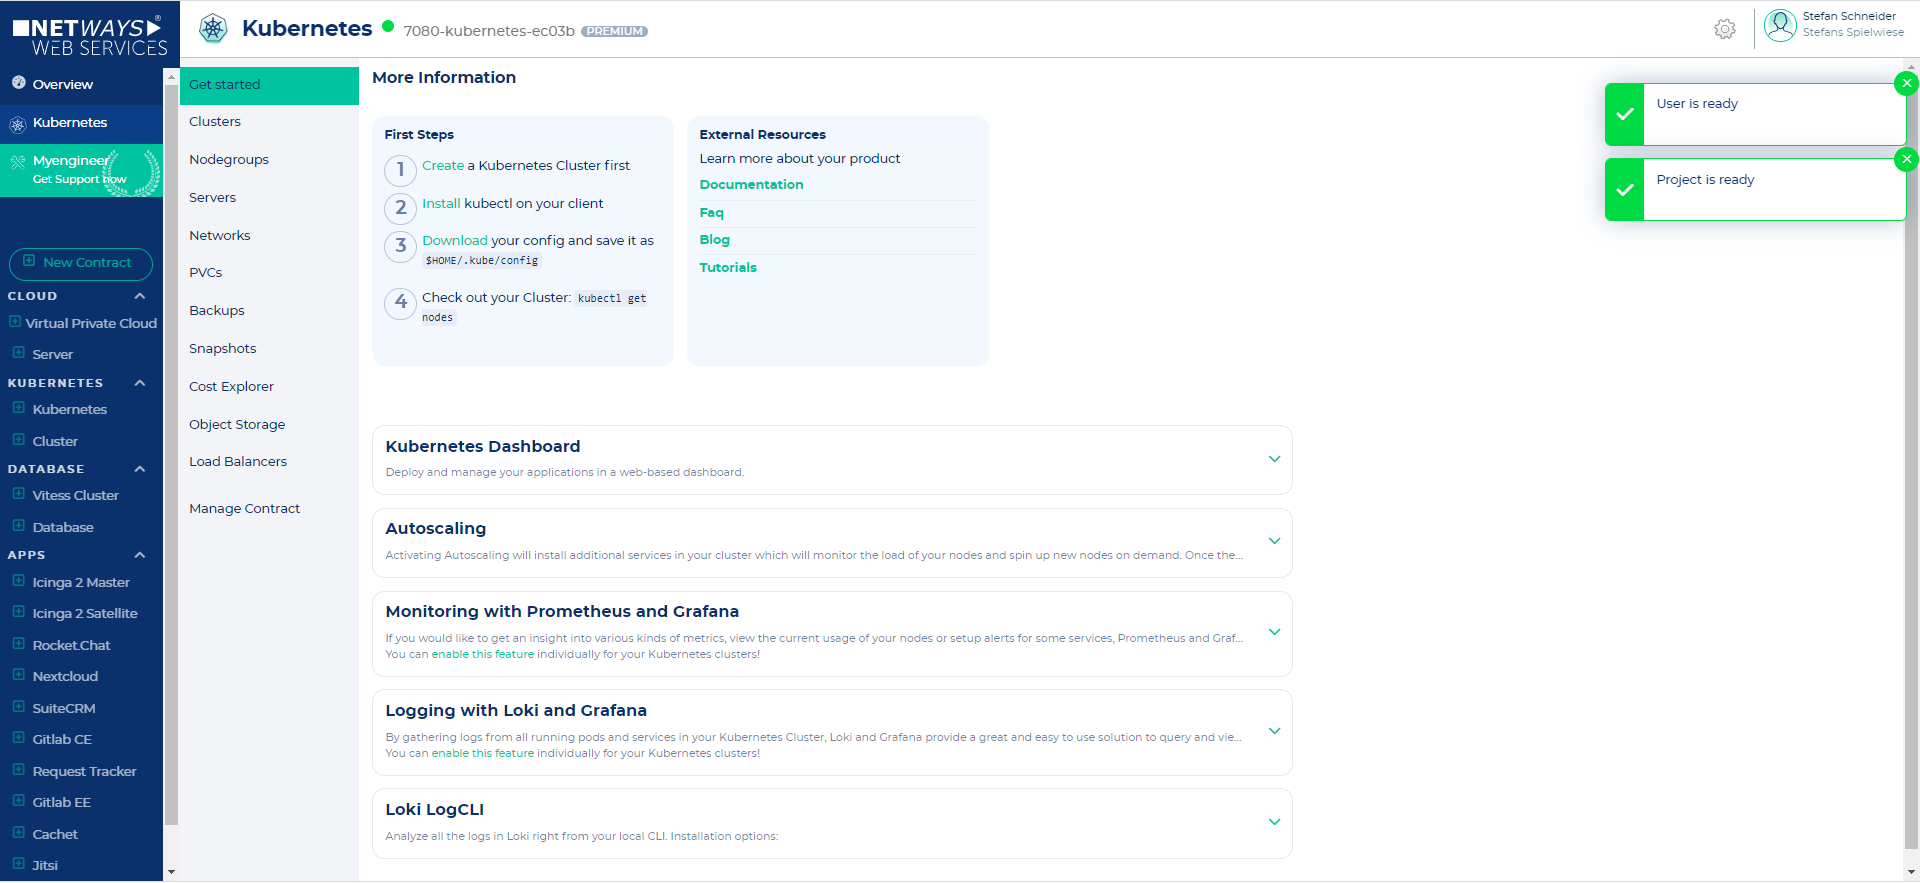
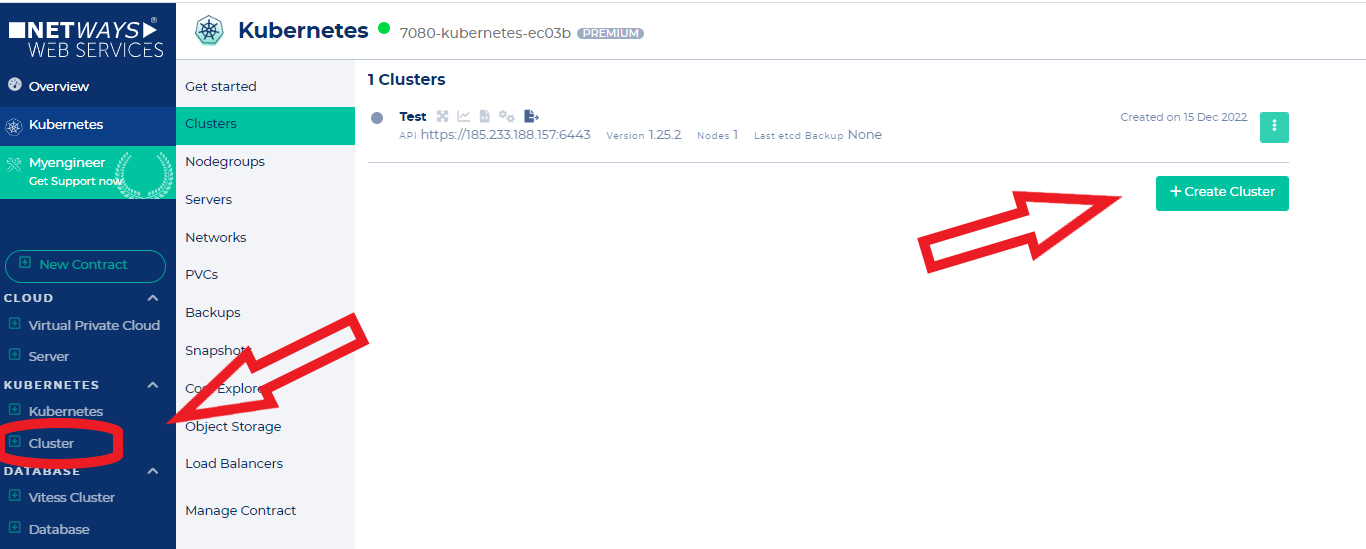
Let's switch to the Clusters submenu and click the "Create Cluster" button.
[](https://docs.nws.netways.de/uploads/images/gallery/2022-12/cfzNIUeQqzV4zZcr-k8s-4.PNG)
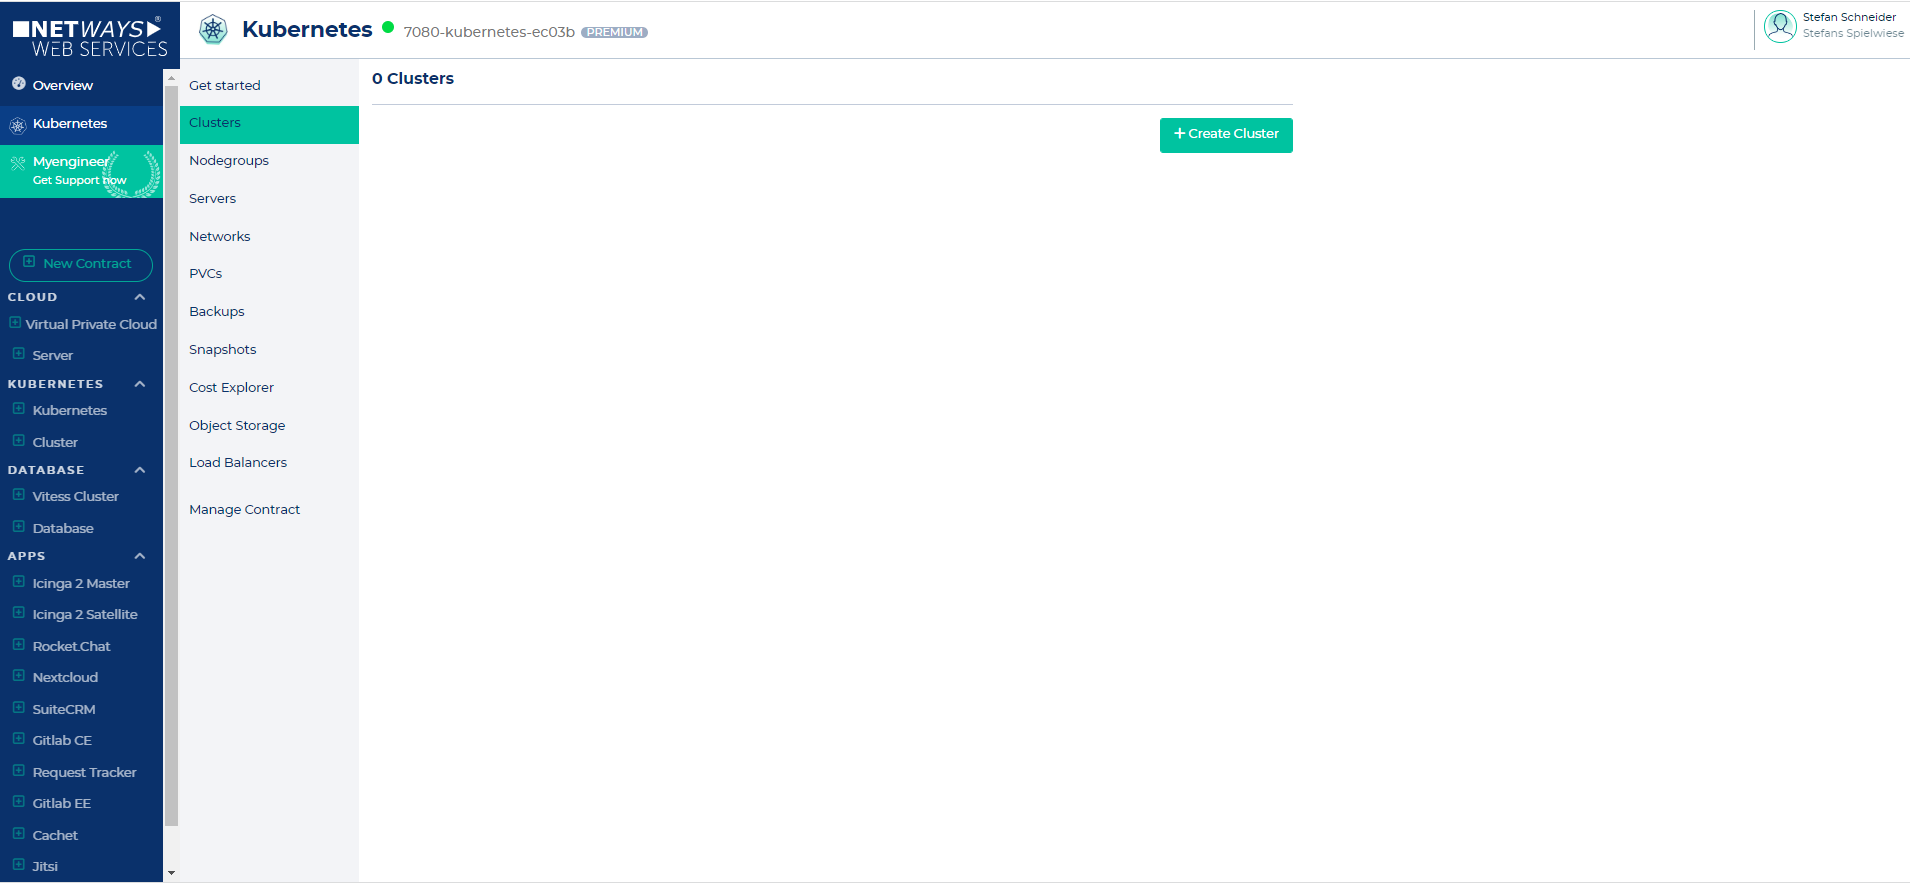
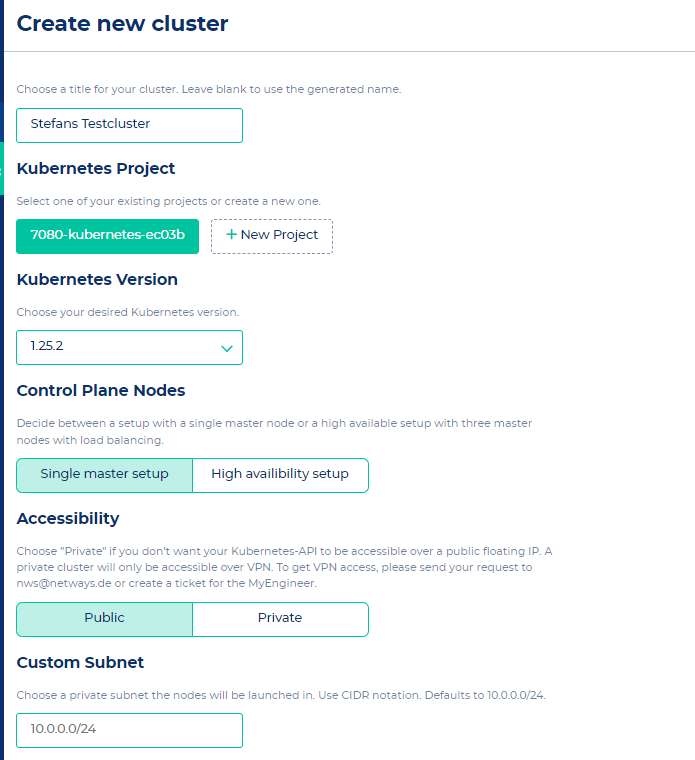
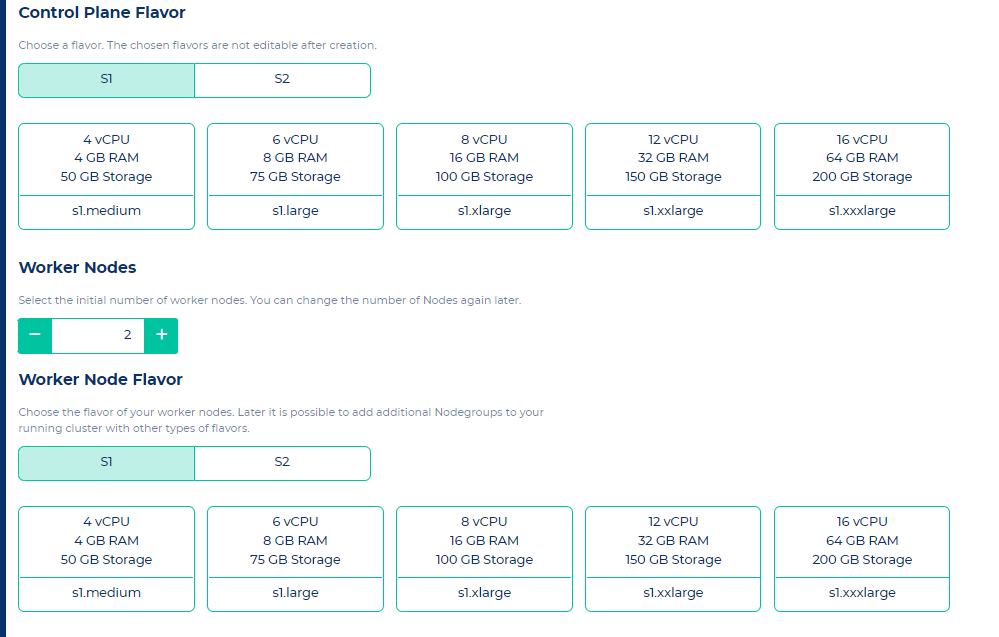
On the "Create new cluster" page you can configure the cluster according to your requirements. The creation of the cluster should take around 5 - 10 minutes.
[](https://docs.nws.netways.de/uploads/images/gallery/2022-12/io3Ls8lpAWX7hVWQ-k8s-5.PNG)
[](https://docs.nws.netways.de/uploads/images/gallery/2022-12/39q6t9E1LvD8FqXb-k8s-6.PNG)
# Install kubectl and kubelogin
#### [kubectl](https://kubernetes.io/docs/tasks/tools/)
kubectl is the command-line tool to manage your Kubernetes clusters and is available for Linux, Windows and MacOS. For an easy installation follow the official instructions on [kubernetes.io](https://kubernetes.io/docs/tasks/tools/ "Install instructions for kubectl ").
#### [kubelogin](https://github.com/int128/kubelogin#setup) (kubectl oidc-login)
kubelogin is a plugin that extends kubectl with OpenID Connect. This is mandatory to use NWS-ID with your Kubernetes cluster. Follow the [official instructions](https://github.com/int128/kubelogin#setup) for easy installation.
# Deciding on a CNI
We support two different CNIs, that being Flannel and Cilium. Flannel is known for it's simplicity and Cilium for it's advanced even service mesh like features.
## Flannel
[](https://docs.nws.netways.de/uploads/images/gallery/2023-09/mRsLTl4DqPpl4uJ6-image-1693570795261.png)
Flannel focuses on the integral part that is the network connection itself. It does not provide any NetworkPolicies or traffic encryption, but it is rock solid when it comes to inter pod communication. That makes it a good choice if you want to chain CNIs and/or add a Service-Mesh on top of it.
## Cilium
[](https://docs.nws.netways.de/uploads/images/gallery/2023-09/GuuwR7QrTlO6T6KX-image-1693570978810.png)
If you are interested in more advanced CNI features like NetworkPolicies, traffic encryption, mutal TLS and network Observability, Cilium is the right choice for you. It can provide many features that would otherwise neccesstiate a full blown ServiceMesh like [Istio](https://istio.io/). You can find out more on their website: [https://cilium.io](https://cilium.io).
# Connect to the created cluster
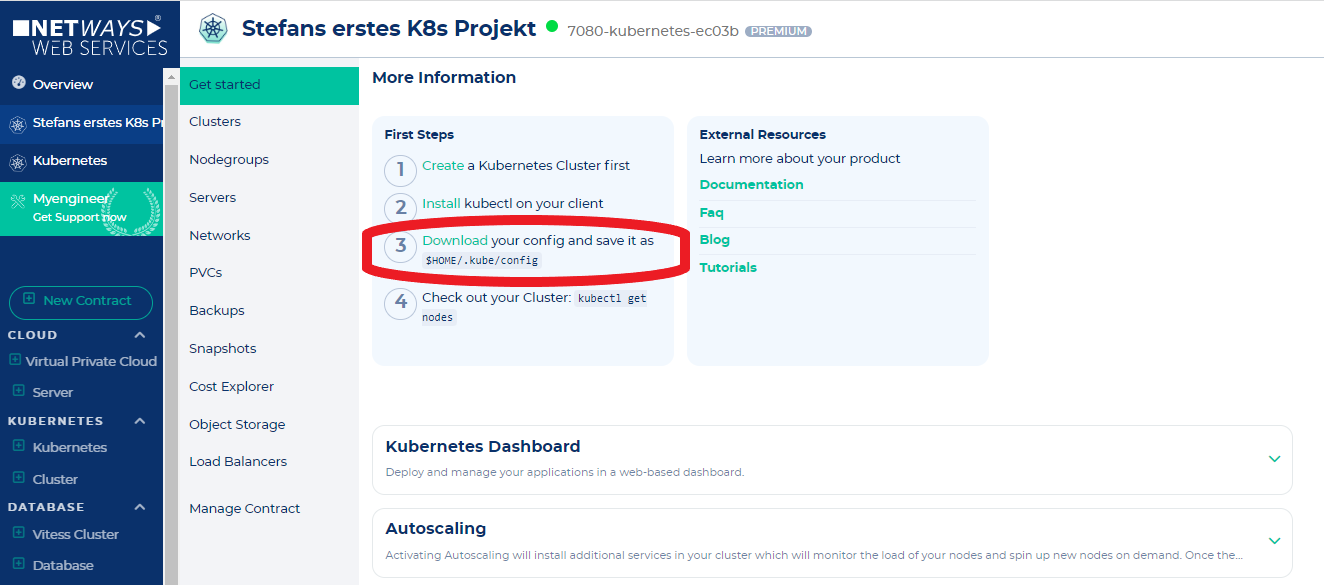
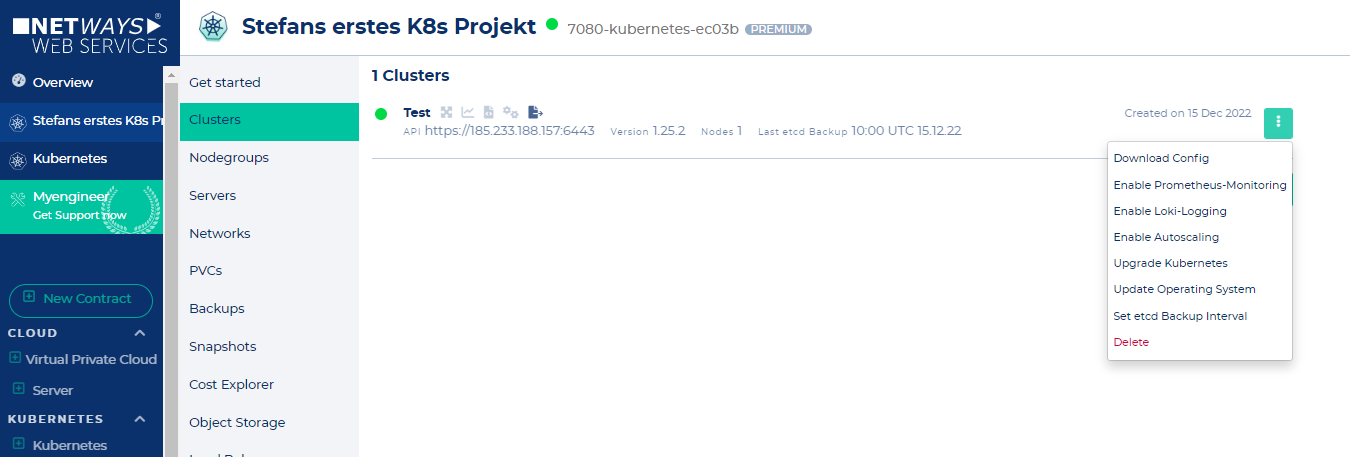
Now that the cluster is built and kubectl is already installed, it is time to connect to the cluster. This is done by clicking on "Download-Config" in the context menu next to the cluster in the NWS backend.
[](https://docs.nws.netways.de/uploads/images/gallery/2022-12/6DGESi1pQPTZETid-k8s-9-download-config.PNG)
[](https://docs.nws.netways.de/uploads/images/gallery/2022-12/GSshp12ZThozsGUR-k8s-9-download-config-2.PNG)
The just downloaded Config must now be moved to the correct place.
To do this, we create a directory in the user home that is still required (if it does not exist) and copy the file into it. At the end we adjust the rights. All work is done as a local user:
```bash
mkdir ~/.kube
mv ~/Downloads/config ~/.kube/
chmod 0600 ~/.kube/config
```
Kubectl should now automatically use the new config. To see if works we can try to list all cluster nodes as done below. If you use NWS-ID, your browser will open for authentication. After that, just switch back to the terminal.
```bash
$ kubectl get nodes
NAME STATUS ROLES AGE VERSION
workshop-virgin2-ytwudzfwjco6-master-0 Ready master 17h v1.23.1
workshop-virgin2-ytwudzfwjco6-node-0 Ready 17h v1.23.1
```
# Starting further clusters in the same K8s project
If you need a staging cluster and a production cluster, this can easily be done in the same Kubernetes app - but you'll need to launch separate clusters for each.
[](https://docs.nws.netways.de/uploads/images/gallery/2022-12/MfgcBRuG8gAENhIF-k8s-8-further-k8s-cluster-within-the-project.PNG)
Multiple clusters can be started in the same product, even with the same subnet.
The respective systems of the cluster are also provided normally in the same subnet, but then receive different addresses from the DHCP in the same subnet.
The communication with each cluster is done via its own Config and thus each cluster can also work only with its workers.
# Caution!
With NWS Managed Kubernetes you have full control over all resources in your cluster. Please adhere to these rules:
- do not schedule your own pods on master nodes
- keep out of the kube-system namespace \*
\* unless you want to do stuff that is well documented on this site. For example [setting static hostnames in CoreDNS](https://docs.nws.netways.de/link/2#bkmrk-static-hostnames).
Scheduling your own workloads on master nodes could cause API downtimes due to OOM events. Editing or creating resources in the kube-system namespace could break critical cluster services.
# Administrative Tasks
# Nodes and Nodegroups
## Resizing Nodegroups
Nodes are organized in nodegroups. If you want to create new nodes or delete existing ones you have to resize the nodegroup. The nodegroup defines which flavor will be used for new nodes.
To resize a nodegroup select the "Nodegroups" tab and click on the "Resize" button in the context menu. Note that it is not possible to resize the master nodegroup. Select the desired node count and finally click on "Resize Nodegroup".
## Create Nodegroups
A cluster has two nodegroups by default. The master nodegroup and the default nodegroup. You can't delete these nodegroups. In the case of the default nodegroup it is possible to scale the node count to zero, though.
To create a nodegroup click on the "Create Nodegroup" button and customize the new nodegroup to your wishes.
# Cluster Autoscaling
Here is how to enable Cluster Autoscaling:
First click "Enable Autoscaling" in the cluster's context menu. This will create the cluster-autoscaler deployment in your cluster. To ensure that everything went fine, run the following command:
```
$ kubectl get deployment -n kube-system cluster-autoscaler
NAME READY UP-TO-DATE AVAILABLE AGE
cluster-autoscaler 1/1 1 1 12m
```
After successfully deploying the cluster-autoscaler you need to configure each nodegroup that should be autoscaled. Switch to the nodegroups tab and click on the "Edit" button of the nodegroup's context menu. Choose "Enabled" and select the desired mininum and maximum node count.
[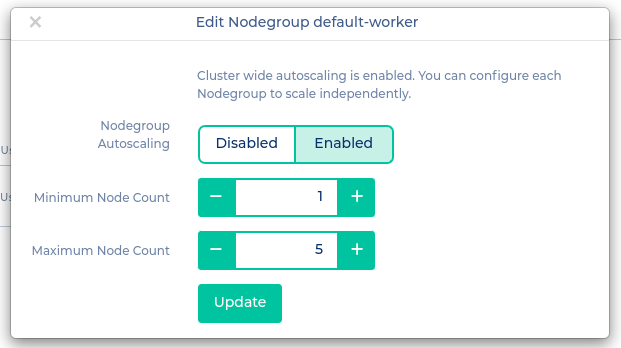](https://docs.nws.netways.de/uploads/images/gallery/2022-12/RHlDIcgCxGZeSlHg-screenshot-from-2022-12-19-12-59-54.png)
# Backup
## ETCD Backups for the state of your k8s cluster
If a K8s cluster is damaged, the state of the K8s cluster can be restored with an etcd backup. Here is stored for example which containers and which volumes should be running.
The state of your cluster is stored in the etcd key-value-store. You can configure periodic backups for the etcd store.
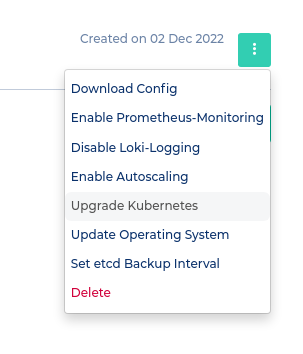
To enable etcd backups you need to click "Set etcd Backup interval" in the cluster's context menu.
[](https://docs.nws.netways.de/uploads/images/gallery/2023-03/eD7ImYN4GpN6BGZC-k8s-12-etcd-backup-1.png)
Now choose your desired backup interval.
[](https://docs.nws.netways.de/uploads/images/gallery/2023-03/oMrlqcZnjSN6FC6i-k8s-13-backup-2.png)
The etcd backups are stored in the S3-Object-Storage. You can find the credentials in the "Object Storage" section of the Kubernetes interface.
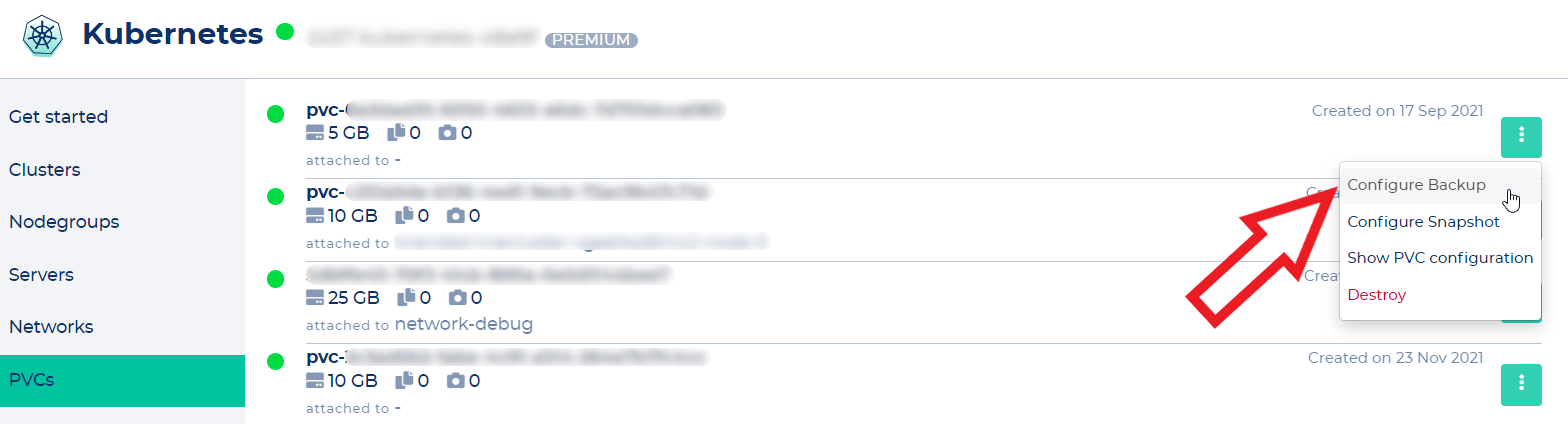
## PVC Backups for your workload
etcd Backups just save the state of your K8s cluster, but not your workload.
The actual application and its data must be backed up separately via the PVC backups.
To enable backups of your workload, you need to click "Configure Backup" in the PVC's context menu.
[](https://docs.nws.netways.de/uploads/images/gallery/2023-03/FsbHbv1yOJBPCqBG-k8s-14-pvc-backup-1.png)
Now choose your desired backup interval.
[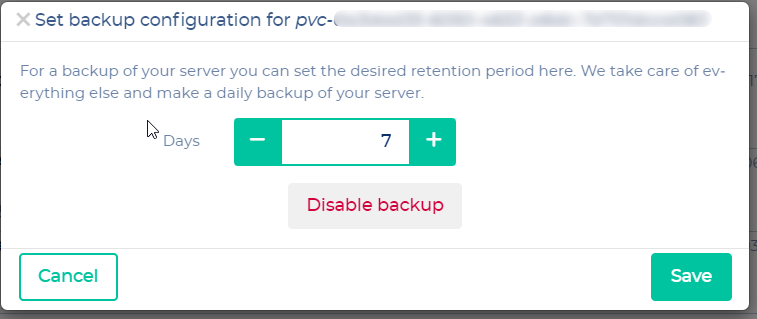](https://docs.nws.netways.de/uploads/images/gallery/2023-03/Oago4g6k47VuCOrV-k8s-15-pvc-backup-2.png)
# Upgrades
## Kubernetes Upgrades
### Supported Versions
||< v1.24|v1.25|v1.26|v1.27|v1.28|v1.29|v1.30
|-:|:-:|:-:|:-:|:-:|:-:|:-:|:-:
|Supported||||✔️ [1]|✔️|✔️|✔️
|Best effort||✔️|✔️
|Deprecated|✔️
[1]: supported until June 2024.
#### What is the recommended way to upgrade NWS Managed Kubernetes
We recommend to upgrade the masters by two minor versions. Afterwards you can upgrade extra nodegroups to the version of the masters. This way you can skip a minor version on the nodes.
Tip: Replacing extra nodegroups is in most cases faster than upgrading existing ones. Just start new nodegroups (the nodes will spawn with the current Kubernetes version of the masters) and delete the old ones. Only do this if you are sure that you don't have persistent data stored on the nodes' filesystems.
#### How do I start a Kubernetes version upgrade on the masters?
**Note that the steps below will only upgrade the master nodegroup and the default-worker nodegroup. See the next Question to find out how to upgrade extra nodegroups.**
To upgrade to a more recent Kubernetes version you have to press the "Upgrade Kubernetes" button in the cluster's context menu. Afterwards choose the Kubernetes version you want to upgrade to and press "Upgrade" in the modal to start the upgrade.
[](https://docs.nws.netways.de/uploads/images/gallery/2022-12/P29KZVVcg0XPoRLJ-image.png)
- If you do not see an upgrade button you have to disable OS Upgrades first
- Do not enable OS Upgrades while running a Kubernetes Upgrade
- Please make sure that the cluster health status is "healthy" before upgrading
#### How do I upgrade extra worker nodes?
To upgrade extra worker nodes you have to switch to the nodegroup menu. In the context menu of the nodegroups you can select "Upgrade". Click the "Upgrade!" button in the modal to start the upgrade.
Note that you can not choose the Kubernetes version of extra node groups. It is only possible to upgrade to the current master version.
[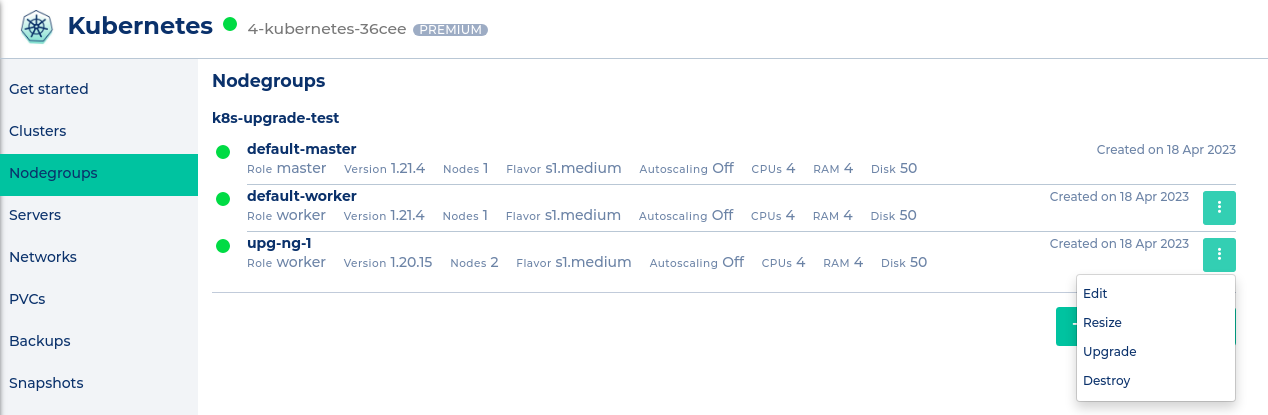](https://docs.nws.netways.de/uploads/images/gallery/2023-06/jH2HmcTt4SzsvTcI-screenshot-from-2023-06-09-17-29-34.png)
#### What will be upgraded?
On the master node(s)
- etcd
- kube-apiserver
- kube-controller-manager
- kube-scheduler
On master and worker node(s)
- kube-proxy
- kubelet
Also the cluster services in kube-system namespace will be upgraded.
#### How is the Upgrade performed?
The nodes are upgraded one by one.
**Important**: Each node will be drained during the upgrade, which means that all the pods on a node are evicted and rescheduled. Make sure to have enough resources left in your cluster so that pods can be rescheduled quickly on other nodes.
#### How long will the upgrade take?
The Upgrade takes 5 to 10 minutes per node.
#### Where can I get help for Kubernetes upgrades?
You should always consider to get a [MyEngineer](https://docs.nws.netways.de/books/myengineer) involved if you upgrade one of your NWS Kubernetes clusters, especially on production clusters. Our support can help you to detect breaking changes you will run into when upgrading. With the help of MyEngineer you can keep upgrade related downtimes as low as possible.
## Operating System Updates
To configure automatic OS Upgrades for your Kubernetes nodes, you have to click on "Update Operating System" in the cluster's context menu.
The upgrades are orchestrated by zincati. You get to choose between immediate, periodic and lock-based upgrades. Keep in mind that your nodes will be rebooted if an upgrade takes place. Take a look at the [zincati documentation](https://coreos.github.io/zincati/usage/updates-strategy/) for further explanations.
We maintain our own FCOS updates graph to be able to test the official releases before making them available to you.
# One Click Deployments
We prepared some software stacks that you can deploy to your cluster with just one click.
## Prometheus monitoring
Click the "Enable Prometheus-Monitoring" button in the cluster's context menu to install the [kube-prometheus-stack helm chart](https://github.com/prometheus-community/helm-charts/tree/main/charts/kube-prometheus-stack) to your cluster. The helm release name is nws-prometheus-stack and it will be installed in the kube-system namespace.
Check out the instructions in the "Get started" tab to find out how to access the components of the prometheus stack.
## Loki Logging
Click the "Enable Loki-Logging" button in the cluster's context menu to install the [loki](https://grafana.github.io/loki/charts/) and [grafana](https://grafana.github.io/helm-charts/) helm chart to your cluster. The helm release names are nws-loki and nws-loki-grafana, both residing in the kube-system namespace.
Check out the instructions in the "Get started" tab to find out how to access loki and grafana.
# StorageClasses
Our Managed Kubernetes clusters come with a couple of predefined storage classes. If there is no storage class that meets your needs, custom ones can be created. For more information take a look at the [Cinder-CSI Driver documentation](https://github.com/kubernetes/cloud-provider-openstack/blob/master/docs/cinder-csi-plugin/using-cinder-csi-plugin.md#supported-parameters) or feel free to [contact our support team](https://nws.netways.de/myengineer/) for assistance.
```shell
$ kubectl get sc
NAME PROVISIONER RECLAIMPOLICY VOLUMEBINDINGMODE ALLOWVOLUMEEXPANSION
encrypted cinder.csi.openstack.org Delete Immediate true
encrypted-high-iops cinder.csi.openstack.org Delete Immediate true
high-iops cinder.csi.openstack.org Delete Immediate true
nws-storage cinder.csi.openstack.org Delete Immediate true
standard (default) cinder.csi.openstack.org Delete Immediate true
```
## standard (Default)
```yaml
---
apiVersion: storage.k8s.io/v1
kind: StorageClass
metadata:
annotations:
storageclass.kubernetes.io/is-default-class: "true"
name: standard
allowVolumeExpansion: true
parameters:
csi.storage.k8s.io/fstype: ext4
provisioner: cinder.csi.openstack.org
reclaimPolicy: Delete
volumeBindingMode: Immediate
```
The StorageClass `standard` is the default class that is used when no StorageClass is specified.
It provisions an **ext4 formatted** Volume in OpenStack and deletes it if the referencing PersistentVolumeClaim (**PVC**) gets deleted. **VolumeExpansion** is also supported. It enables the user to update the size of a PVC and let Kubernetes handle the resize.
The **IOPS limit** is set to 1000 IOPS, but enables a boost of up to 2000 IOPS for 60s.
## nws-storage
```yaml
---
apiVersion: storage.k8s.io/v1
kind: StorageClass
metadata:
name: nws-storage
allowVolumeExpansion: true
parameters:
csi.storage.k8s.io/fstype: xfs
provisioner: cinder.csi.openstack.org
reclaimPolicy: Delete
volumeBindingMode: Immediate
```
The `nws-storage` class is similar to `standard`, but uses **xfs** as it's filesystem.
This is useful for PersistentVolumeClaims with many small files, e.g. databases or logging systems, as xfs can scale inodes dynamically. This stands in contrast to ext4, which creates a fixed size of inodes at creation time.
## high-iops
```yaml
---
apiVersion: storage.k8s.io/v1
kind: StorageClass
metadata:
name: high-iops
parameters:
csi.storage.k8s.io/fstype: ext4
type: Ceph-High-IOPS
allowVolumeExpansion: true
provisioner: cinder.csi.openstack.org
reclaimPolicy: Delete
volumeBindingMode: Immediate
```
The `high-iops` StorageClass uses a different volume type in OpenStack called `Ceph-High-IOPS`, which allows the system **up to 2000 IOPS** for sustained loads and 4000 IOPS for bursts (60s).
## encrypted(-high-iops)
```yaml
---
apiVersion: storage.k8s.io/v1
kind: StorageClass
metadata:
name: encrypted
parameters:
csi.storage.k8s.io/fstype: ext4
type: Ceph-Encrypted(-High-IOPS)
allowVolumeExpansion: true
provisioner: cinder.csi.openstack.org
reclaimPolicy: Delete
volumeBindingMode: Immediate
```
The StorageClasses starting with `encrypted` use OpenStacks volume type that transparently enables encryption for the volume. The two classes differ in the same way `standard` and `high-iops` do.
## Custom
You can of course also create your own StorageClass with any of the parameters and options available to the [Cinder CSI Driver](https://github.com/kubernetes/cloud-provider-openstack/blob/master/docs/cinder-csi-plugin/using-cinder-csi-plugin.md#supported-parameters) and [Kubernetes](https://kubernetes.io/docs/concepts/storage/storage-classes/).
For reference, the following custom StorageClass would use the `Ceph-Encrypted` Volume type with the XFS format while retaining the backing PersistentVolume after deleting the PersistentVolumeClaim:
```yaml
$ kubectl apply -f - < 4245
Forwarding from [::]:4245 -> 4245
```
### Remote exec
```bash
$ alias hubble='kubectl exec -in kube-system ds/cilium -c cilium-agent -- hubble'
$ hubble status
Healthcheck (via unix:///var/run/cilium/hubble.sock): Ok
Current/Max Flows: 4,095/4,095 (100.00%)
Flows/s: 4.07
```
## Observing
To observe any traffic (much like tcpdump) you can just run observe in --follow mode. It will show any traffic that runs through your cluster.
```bash
$ hubble observe --follow
Sep 4 07:28:18.255: 10.100.2.60:48428 (host) -> 10.100.2.77:4240 (health) to-endpoint FORWARDED (TCP Flags: ACK, PSH)
Sep 4 07:28:18.256: 10.100.2.60:48428 (host) <- 10.100.2.77:4240 (health) to-stack FORWARDED (TCP Flags: ACK, PSH)
Sep 4 07:28:23.290: 10.100.5.13:55176 (remote-node) <- 10.100.2.77:4240 (health) to-overlay FORWARDED (TCP Flags: ACK)
Sep 4 07:28:23.292: 10.100.5.13:55176 (remote-node) -> 10.100.2.77:4240 (health) to-endpoint FORWARDED (TCP Flags: ACK)
Sep 4 07:28:23.613: 10.100.2.60:37112 (host) -> kube-system/coredns-69bc699795-trnxn:8181 (ID:17050) to-endpoint FORWARDED (TCP Flags: SYN)
Sep 4 07:28:23.613: 10.100.2.60:37112 (host) <- kube-system/coredns-69bc699795-trnxn:8181 (ID:17050) to-stack FORWARDED (TCP Flags: SYN, ACK)
Sep 4 07:28:23.613: 10.100.2.60:37112 (host) -> kube-system/coredns-69bc699795-trnxn:8181 (ID:17050) to-endpoint FORWARDED (TCP Flags: ACK)
Sep 4 07:28:23.613: 10.100.2.60:34644 (host) -> kube-system/coredns-69bc699795-trnxn:8080 (ID:17050) to-endpoint FORWARDED (TCP Flags: SYN)
```
Hubble can also filter based on many different identies, like pod labels, namespaces and dns lookups.
```bash
$ hubble observe --follow \
--pod default/nginx-5f8f49fff4-m8m9h \
--not --label k8s-app=kube-dns
Sep 4 08:23:29.510: default/nginx-5f8f49fff4-m8m9h:53700 (ID:37906) -> 142.250.184.238:80 (world) to-stack FORWARDED (TCP Flags: SYN)
Sep 4 08:23:29.519: default/nginx-5f8f49fff4-m8m9h:53700 (ID:37906) -> 142.250.184.238:80 (world) to-stack FORWARDED (TCP Flags: ACK)
Sep 4 08:23:29.519: default/nginx-5f8f49fff4-m8m9h:53700 (ID:37906) -> 142.250.184.238:80 (world) to-stack FORWARDED (TCP Flags: ACK, PSH)
Sep 4 08:23:29.542: default/nginx-5f8f49fff4-m8m9h:53700 (ID:37906) -> 142.250.184.238:80 (world) to-stack FORWARDED (TCP Flags: ACK, FIN)
Sep 4 08:23:29.548: default/nginx-5f8f49fff4-m8m9h:53700 (ID:37906) -> 142.250.184.238:80 (world) to-stack FORWARDED (TCP Flags: ACK)
```
That for example will monitor all traffic of the nginx pod found in the `default` namespace except DNS lookups.
Another common use case would be to filter based on destination port. This can be done with the `--to-port` Flag. If you need more info, the output can be formatted as json:
```bash
$ hubble observe --follow --pod nginx-5f8f49fff4-m8m9h --to-port 80 -o json | jq
{
"flow": {
"time": "2023-09-04T08:25:35.610232081Z",
"uuid": "c488a8f9-1301-4490-84f1-7ed96afd36f3",
"verdict": "FORWARDED",
"ethernet": {
"source": "d6:5b:64:ee:1c:86",
"destination": "e2:1e:63:4a:0b:cf"
},
"IP": {
"source": "10.100.3.241",
"destination": "142.250.184.238",
"ipVersion": "IPv4"
},
"l4": {
"TCP": {
"source_port": 33610,
"destination_port": 80,
"flags": {
"SYN": true
}
}
},
"source": {
"ID": 740,
"identity": 37906,
"namespace": "default",
"labels": [
"k8s:app=nginx",
"k8s:io.cilium.k8s.namespace.labels.kubernetes.io/metadata.name=default",
"k8s:io.cilium.k8s.policy.cluster=default",
"k8s:io.cilium.k8s.policy.serviceaccount=default",
"k8s:io.kubernetes.pod.namespace=default"
],
"pod_name": "nginx-5f8f49fff4-m8m9h",
"workloads": [
{
"name": "nginx",
"kind": "Deployment"
}
]
},
"destination": {
"identity": 2,
"labels": [
"reserved:world"
]
},
"Type": "L3_L4",
"node_name": "cl-cilium-15-jibbo4pnpgn7-node-1",
"event_type": {
"type": 4,
"sub_type": 3
},
"traffic_direction": "EGRESS",
"trace_observation_point": "TO_STACK",
"is_reply": false,
"Summary": "TCP Flags: SYN"
},
"node_name": "cl-cilium-15-jibbo4pnpgn7-node-1",
"time": "2023-09-04T08:25:35.610232081Z"
}
```
# Related Links
On our [tutorials page](https://nws.netways.de/tutorials/) you will find numerous articles about Kubernetes.
# Monitoring
- We monitor the health of your K8s cluster 24/7
- If a master or worker changes to an unhealthy state, we are alerted and fix the problem
- In addition, we deploy the **nws-agent-stack** in each cluster
- It consists of a **prometheus-agent** pod and a **kube-state-metrics** pod
- The purpose of the nws-agent-stack is to monitor the system services (everything within the kube-system namespace) in your cluster. This is used, for example, to ensure that PVCs are mapped correctly
- **Do not change its configuration!**
- We do **not** monitor the containers located in your namespaces by default
- If you want to monitor your workloads, you need to install your own monitoring solution in your cluster
- Check out the [NWS-Prometheus-Stack](https://docs.nws.netways.de/link/57#bkmrk-prometheus-monitorin) for a customizable solution.
Our MyEngineers are also happy to help with setup here.